| How to Install a Refrigerator Water Filter | ||||||||
|---|---|---|---|---|---|---|---|---|
Install a refrigerator water filter to remove the bad taste from drinking water and ice cubes. An inexpensive inline refrigerator water filter reduces chlorine, rust, sediment and odors for water- and ice-dispensing refrigerators. Filters are available from home centers and appliance stores. The filter splices into the standard 1/4-in. copper or plastic refrigerator water supply line. Locate the filter as close as possible to the water shutoff valve. Leave at least 6 in. of clearance between the wall and refrigerator when installing the filter behind a refrigerator. Once you install the system, quick-connect fittings make it easy to change the filter. Turn off the shutoff valve and disconnect the 1/4- in. supply line from the valve (hold a bucket under the valve to catch residual water). Some types of valves leak. You may have to turn off the main water supply valve to your home. Cut back the tubing and attach the quick-connect fittings. Snap the filter into the fittings. Secure the tubing on the fridge side with a 1/4-in. copper strap and flush the filter to dispense any fine loose carbon particles. If a leak occurs, tighten the nuts or fittings. Strap the filter to any nearby support to take stress off the tubing. Write the installation date on the filter and replace it every six months with a new one. |
||||||||
|
||||||||
-
About Me

CATEGORIES Appliance Repair Service (56) Uncategorized (0) ARCHIVE June 2014 (10) May 2014 (22) April 2014 (24) PAGES RESOURCES PHP: Hypertext Preprocessor The PHP Resource Index ApPHP PHP Builder AUTHORS Eugene Chv NyTech Appliance

| Straighten Sagging Refrigerator Doors | ||||||||
|---|---|---|---|---|---|---|---|---|
Straighten Sagging Refrigerator DoorsStraighten a crooked fridge door in less than five minutes. You save money too by stopping cool air leaks around the door. A sagging refrigerator or freezer door doesn't just look bad. It can cause the door gskets to seal poorly, and that means your fridge will work harder to keep the milk cold. It can also lead to frost buildup in the freezer. To realign the door, just pry off the hinge cap and loosen the hinge screws. Then align the door with the top of the refrigerator. Adjust only the top hinge to straighten an upper door. To realign the lower door, adjust the middle hinge. Moving the middle hinge will affect the upper door, so you may have to adjust the top hinge afterward. |
||||||||
|
||||||||

| How to Reverse a Refrigerator Door | ||||||||
|---|---|---|---|---|---|---|---|---|
You moved the old fridge into the Men's Crisis Center (aka the garage) and now the doors open the wrong way. And that makes for inconvenient beverage access, a problem that must be corrected before pursuing other home improvement activities. It's an easy DIY project, but you do have to pay attention to the disassembly and reassembly steps and keep track of the plastic parts. If you put them back in the wrong place or leave them out, the doors won't close properly. The entire job takes less than an hour and requires just screwdrivers, pliers and a socket set. Start by removing all the food from the upper and lower door shelves. Then pry off the upper hinge trim piece (if equipped) with a flat-blade screwdriver. Hold the door in place while you remove the upper hinge screws. Then remove the upper door. Next, remove the middle hinge screws and the bottom door. Check for plastic parts at both hinges and label them. Then remove the bottom hinge and mount it on the opposite side of the fridge. Swap the door handles and the door stops to the opposite sides of the door. This next part makes most people crazy, but it makes sense when you think it through. When you flip the middle hinge to the opposite side of the fridge, the upper and lower hinge pins will be facing the wrong direction. Don't panic! Just reverse the hinge pin. With the middle hinge pin reversed, go ahead and reassemble the doors and hinges and reload your fridge. |
||||||||
|
||||||||
| Fix and Replace a Refrigerator Door Gasket | ||||||||
|---|---|---|---|---|---|---|---|---|
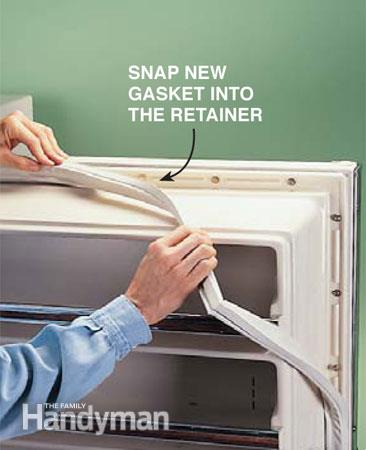
How to replace the door gasket
Each door of your refrigerator has a molded rubber gasket to keep the cold in and the heat out. When this gasket gets old and brittle, it leaks. If your refrigerator is running more frequently and you suspect it's losing cold air, conduct these simple tests. First, inspect the door gasket. Is there condensation or even blackish mold anywhere around it? If so, leaking cold air is probably causing warmer kitchen air to condense. Next, close the refrigerator door on a dollar bill. Pull the bill out slowly. If there is a slight drag on the bill, your door gasket is OK. If the bill slips out easily and moisture and/or mold are present, it's time to invest about $50 to $75 (depending on the appliance brand and door size) and 30 minutes to replace the door gasket. Find the refrigerator make, model and other identification information in the owner's manual. If you don't have a manual, look on the inside edge of the refrigerator door or inside either compartment, near the door, for the manufacturer's identification plate. Search online or check the yellow pages under “Appliances, Major, Parts” for stores or manufacturer service centers that stock your door gasket. You may also be able to find a parts source by visiting your manufacturer's Web site. While you're removing the old door gasket, lay the new one in warm water for a few minutes to make it easier to install. Some gaskets (like ours) are held in place by a metal retainer attached around the door perimeter. Lift the inside edge of the old gasket to reveal the screws locking the gasket into the retainer, then loosen them. Remove the old gasket from the retainer. Starting at one of the top door corners and working out to each side, slip the lip of the new gasket behind the retainer. The gasket fits only the one correct way. Complete the gasket installation and “snug up” but don't fully tighten the retainer screws. Study the position of the door relative to the other door and the refrigerator cabinet. If either the refrigerator or freezer door is sagging or too high, loosen its hinges and align it. Finally, reduce gasket drag by applying a thin layer of petroleum jelly only along the hinge side of the gasket. |
||||||||
|
||||||||
| In home refrigerator repair: Repair Compressor | ||||||||
|---|---|---|---|---|---|---|---|---|
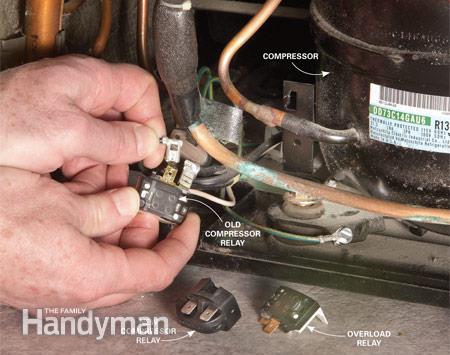
Refrigerator problem? It could be the compressor but before you call the repair service, try these simple repairs. The problem may just be a bad overload or compressor relay.
Try a new overload or compressor
Pull the fridge away from the wall, unplug it and remove the service panel. Swap in the new compressor and overload relays. Then plug it back in to see if the problem is gone. |
||||||||
|
||||||||
| In Home Refrigerator Repair Fix a Broken Water Dispenser Switch | ||||||||
|---|---|---|---|---|---|---|---|---|
Fix a refrigerator water dispenser quickly and easily with standard hand tools and a new switch. You can do it in an hour.Buy a replacement switch and remove the trim panelSo the kids were really thirsty and jammed their glass into the water dispenser on the refrigerator door. Now the paddle is hanging by a wire, and you’re seeing a $300 repair bill. No way! You can do this repair yourself with ordinary hand tools in about an hour. A replacement paddle/switch costs about $75. We’ll show you how to make the repair on a Whirlpool refrigerator. Repairs on other makes are similar. Open the fridge door and write down the model and serial number of the fridge. Then contact a local appliance parts dealer or use the Internet to buy a new switch and paddle. Start by unplugging the refrigerator. Then remove the drip tray to expose the trim panel screws. If you don’t see any screws, unsnap the panel using a plastic putty knife and paint can opener . Lift the trim panel off the door. Replace the broken switchNext, remove the microswitch. The switch retaining pegs are usually broken, so replace them with screws. If the paddle is broken, first disconnect the water tube. Then remove the metal paddle retainer plate and swap in a new paddle. |
||||||||
|
||||||||
| Does your dishwasher not drain or not drain completely | ||||||||
|---|---|---|---|---|---|---|---|---|
You might need to call a repairman, but try these three simple tests first.Poor-draining dishwasherFirst, check the drain-hose connection, drain-hose clamp, solenoid and power supply. If that doesn't yield results, check the three things listed below. Check the filter in the dishwasher's tubYou'll find the filter either in the bottom of the tub, surrounding the base of the lower spray arm, or at the back. Check the drain hoseDisconnect the drain hose (usually it's the one with ridges) from the pump and try to blow through the hose to make sure it's clear. Test the drain valveIf you have a valve bracket, your dishwasher has a drain valve. To test the valve, push on the valve bracket to make sure it moves freely. |
||||||||
|
||||||||
| How to Fix a Smelly Dishwasher Cleaning | ||||||||
|---|---|---|---|---|---|---|---|---|
Stop bad dishwasher odors by cleaning food scraps from the tub and running a dishwasher cleaner through a cycle. If you smell bad dishwasher odors after running a cycle, don't reach for the bleach bottle. Bleach is very corrosive to metal parts and doesn't solve the root problem. The smell comes from bacteria that feed on trapped food and grease in the strainer screen at the bottom of the machine, in the jets in the sprayer arms and along the bottom edge of the door. Start by cleaning and rinsing out the screen at the bottom of the tub. Next, clean out any food lodged in the ports of the sprayer arm. Then clean off the bottom edge of the door and the metal lip area that sits below the door. You'll be surprised at how much crud is there. Once you've cleaned those areas, throw in a bottle of dishwasher cleaner and disinfectant ( Iron Out/Lime Out Dishwasher Magic Dishwasher Cleaner & Disinfectant 12 fl oz; order from ebay.com) and run a full cycle with no dishes or dishwashing detergent. Keep those critical areas clean in the future and your stinking problem won't come back.
post By http://www.familyhandyman.com |
||||||||
|
||||||||

| Fix a Dishwasher Rack | ||||||||
|---|---|---|---|---|---|---|---|---|
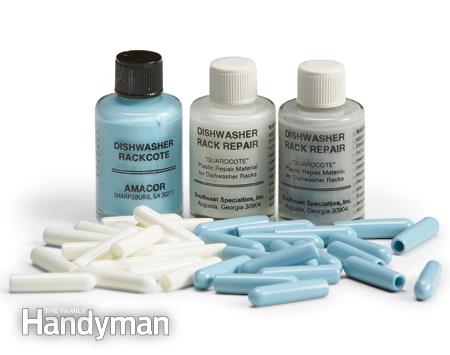
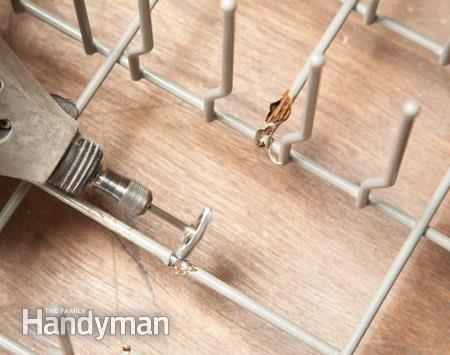
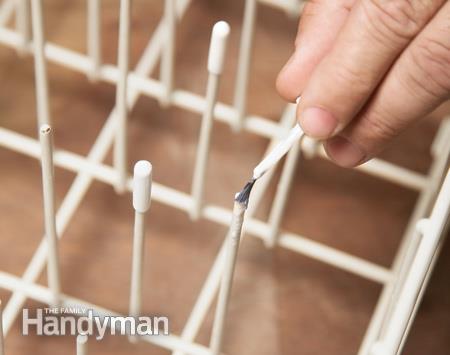
A rusty dishwasher rack can leave rust streaks on dishes. Instead of buying an overpriced replacement rack, recoat and cover the rusty spots yourself in less than an hour. Dishwasher rack tines break off or lose the protective coating at the tips and then you get rust spots on your dishes. New racks cost about $80 (and up). But you can fix yours in less than an hour and for a fraction of that cost. Buy a bottle of vinyl repair paint and a package of replacement tips to match your rack color (from any appliance parts store or find-a-fix.com). Cut off the rusted tips with a rotary tool and cutoff wheel. Then retip the tines (Photo 2). To patch a rusted area around a broken tine, first clean off the rust (Photo 1). |
||||||||
|
||||||||
| Dishwasher Repair Tips: Dishwasher Not Cleaning Dishes | ||||||||
|---|---|---|---|---|---|---|---|---|
Two steps when your dishwasher doesn't clean well, fix it yourself following these simple steps and avoid the expensive professional service call. A simple cleaning often solves the problem. STEP 1 If your dishwasher is running but the dishes aren’t getting clean, one of these simple fixes could solve your problem. Start by consulting your manual to be sure you’re using the right detergent, loading the dishes correctly and maintaining the right hot water temperature. Insufficient water in the dishwasher also can cause poor cleaning. If the float gets stuck in the raised position, the dishwasher won’t fill with water. Another likely cause is a clogged inlet screen or faulty inlet valve. To determine if your dishwasher is getting enough water, start a wash cycle. Open the door when you hear the machine stop filling. The water should reach or come close to the heating coil. If it doesn’t, first make sure the float valve is operating freely . If this doesn’t solve the problem, check the inlet valve and screen. STEP 2 Inlet valves that are starting to fail sometimes make a hammering noise. If you hear this, replace the valve. But before you start any work on the dishwasher, unplug it or turn off the power at the shutoff switch or main circuit panel. Test to see if the power is off by turning on the dishwasher and making sure it doesn’t run. You’ll also have to shut off the water before removing the inlet switch. Usually you’ll find a shutoff valve under the kitchen sink or in the basement or crawl space under the dishwasher. Otherwise, close the main water valve. How to remove the inlet valve. Yours may look different. Whether you’re replacing the valve or simply cleaning the screen, you’ll have to unscrew the brass fitting that connects the water line to the valve. Remove the four screws that secure the valve to the bracket to access the filter screen. Reassemble and reinstall the valve in the reverse order. Wrap Teflon tape around the fitting threads before screwing the fitting into the valve. |
||||||||
|
||||||||
| Home | « Newer Posts | Older Posts » |